
Are you ready to establish a strong online presence and boost your earnings with Wakanow.com? It’s simpler than you think now.
To begin, you’ll need a registered and valid domain name for your website. Just enter your preferred domain name as described in this guide, and we’ll assist you in securing it for your business. This program also allows you to explore Wakanow and Webmanager.NG’s comprehensive bundle with an all-in-one solution. The bundle includes a domain name, hosting, and email services, designed to streamline your online presence.
Here’s an exclusive offer for you when you purchase any hosting plan use the coupon code: WAKANOW for a 10% discount. To get started, follow the simple guide below so you don’t miss out.
Steps on Setting Up Wakanow’s Affiliate Program
1. Open your Browser
On any browser visit WebManager.NG/Partnership/Wakanow
This will take you directly to Wakanow’s affiliate hosting page where you can get started easily while also making and saving money on the go.

It is important to note that, you can’t buy a hosting plan without having a domain name. If you don’t have one, just scroll down to search for the domain name you wish to use to see if it is available, if it is, proceed to register, if it isn’t, you will see varieties of suggested domain names similar to the one you intended to use, you can simply register any of them you like.
2. Search for a Domain Name
If you do not have a domain name already, you can easily get started by searching for and registering your preferred domain name. With the domain name and a hosting plan, you can easily set up your own professional email and build your own website for reselling Wakanow’s products and services like flight tickets.
3. Select a Hosting Plan
Afterward, you will see our different hosting packages and their components, and then select the one that best suits your needs.

4. Copy Coupon Code
After Choosing your desired hosting plan, copy the coupon code attached to it. (WAKANOW)

5. Buy a Hosting Plan
Click on Buy Plan, for the plan you have chosen to use.

6. Order Now
Order now is the next thing you will click on. You can from here choose the hosting capacity you with to have based on your need. The more expensive it becomes, the more resource capacity and power you get.

7. Choose Billing Cycle
By default all the hosting plan billing cycles are for one month, you can choose your desired billing cycle when you scroll down and click on the drop-down arrows where you see ” Choose Billing Cycle”. Note: The higher the billing cycle, the cheaper the amount. For instance, If you want to buy the ”WP kick” plan with the monthly billing cycle, the price is ₦750 but if you are choosing an annual billing cycle that is paying for a year, the price will be ₦7,650 instead of ₦9000 plus a free domain name which allows you to save more money and still save more with the 10% coupon code you have too.

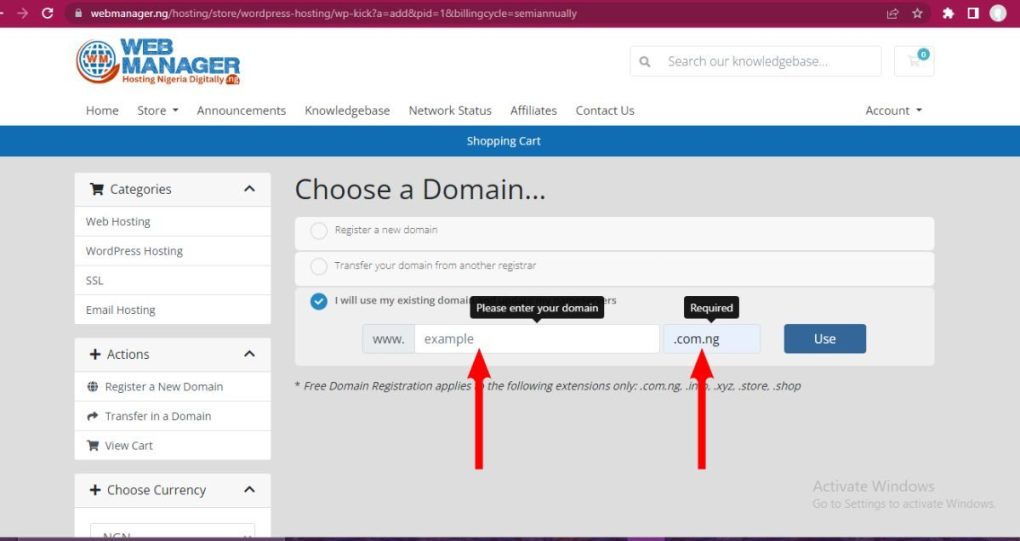
8. Transfer/Register or Use Existing Domain Name
However, buying a hosting plan doesn’t necessarily mean you must register a new domain name, assuming you already have your domain name or you want to transfer your domain from another registrar, you can do it all on the same interface. You will see where to tick either register a new domain, transfer your domain domain from another registrar, or use my existing domain. See how it looks below:
9. Continue
Before you click on continue, check to see if your order is right, and then click on Continue.
Check your Domain Configuration. If you are interested in deploying and using email forwarding, check the checkbox labeled Email Forwarding as we offer this addon for free, and then click on Continue.

10. Checkout
At the Review & Checkout page, check to see if your order was right, and then scroll down to paste the coupon code you copied (WAKANOW); paste this at the field labeled Apply Promo Code.
Click on Validate Code and then click on Checkout.

11. Login or Register a New Account
If you already have an account, then click on Already Registered, otherwise supply the fields with your details.

Supply the field with your company’s name if you have one, otherwise leave it blank. Fill in your address and other information you need.
Next, Choose a desired Password and ensure it’s a strong one. Click on the dropdown feature labeled Please choose a security question, to choose a question you would like to be asked in case you forgot your password.
Then Enter an answer to your chosen question. Don’t forget to choose your currency. For other countries using currencies other than the naira and dollar currency, don’t worry, you can still pay using your preferred currency.
12. Make Payment
Hover down to where to see “How would you like to pay for your order?” You may choose Rave by Flutterwave (Debit/Credit) or Paystack Local/International Payment. if you are not in Nigeria, we suggest you pay using Paystack Local/International Payment as seen below.

With Paystack, Whether you are in Ghana, Ivory Coast, Uganda, United Kingdom, United States, Malaysia, Saudi Arabia, etc…. you can pay for your order using either Verve, Visa, or MasterCard.
Once you fill in your card details, it will detect the location of the bank and convert your order amount to your card currency.

Finally, you are advised to check through before clicking on Complete Order.
If the payment is completed, you will receive E-mails; one asking you to verify your email. Make sure you do so, in case you didn’t get any verification E-mail, you will see where to click on ”Resend Verification Email” in your dashboard.
Conclusion
With this, you have successfully created an account with WebManager.NG through the Wakanow affiliate program utilizing the 10% discount. I hope the guide was helpful in enabling you to get started. Don’t hesitate to contact WebManager.NG for any questions or assistance with any issue whatsoever as our customer support team is available 24/7 to attend to you.